
If you are developing a WordPress or any other website in a local development environment like Xampp, chances are, you often face problems while moving your local files to a remote web server. There are many reasons lies behind the scene for this problem.
Most importantly, the DNS system where web browsers ask for the IP address of a website domain, is not available on your local development machine. The OS of your local machine where you’ve coded your project can be different than the host machine. This can be problematic for the code and hard to Debug when the project is online.
But there is a way can be done through your local development machine and Xampp to create a Virtual Local Web Server name to test your project before moving to production. This will allow you to test your project in just like a remote server but on your development machine.
How to create a Virtual Local Web Server in Xampp.
Step 1:

First, you have to set Apache to support Virtual hosts. In most cases of Xampp installation, it comes with default dummy virtual hosts. You have to change them with actual server information. Assuming your Xampp installation is in Windows C drive and your default port number is 80.
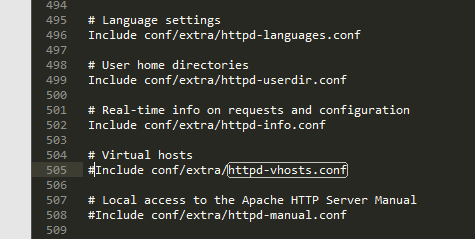
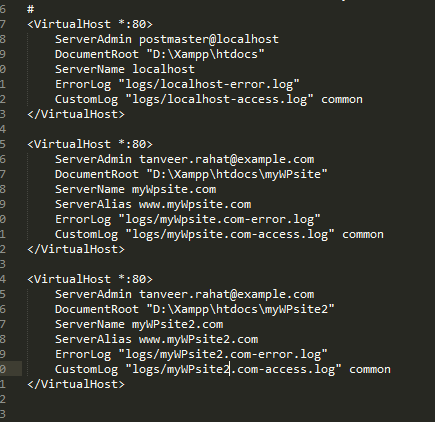
- Open httpd-vhosts.conf file from the C:\xampp\apache\conf\extra directory and look for those lines of code in the image.
- Replace that dummy Virtual Host code with your localhost server information like this code below and save it.
ServerAdmin postmaster@localhost
DocumentRoot "C:\xampp\htdocs"
ServerName localhost
ErrorLog "logs/localhost-error.log"
CustomLog "logs/localhost-access.log" common


ServerAdmin [email protected]
DocumentRoot "C:\xampp\htdocs\mywpsite"
ServerName mywpsite.com
ServerAlias www.mywpsite.com
ErrorLog "logs/mywpsite.com-error.log"
CustomLog "logs/mywpsite.com-access.log" common
Step 2:
Then you have to direct Apache to include this httpd-vhosts.conf file. Normally Xampp comes with this feature enabled when installing but just to make sure that it is included in Apache.
- Open the httpd.conf file in a text editor from the C:\xampp\apache\conf directory and open it in a text editor.
- Make sure to comment out (removing hash) the line which is Including the httpd-vhosts.conf file and save it.
Step 3:
Finally, you have to add the Server Name in the Windows hosts file so that, the traditional DNS can access the local IP to process that DNS request and serve them to the web browser.
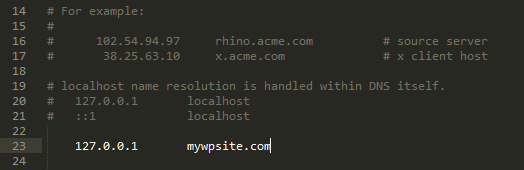
- Open the hosts file from c:\windows\system32\dirvers\etc directory in a text editor and make sure you are in administrative privileges to save the file.
- Add and save the virtual server name you just added and assign the IP address. In Windows, your IP is 127.0.0.1 and here you can add as many server names you want to this IP address.
Restart the Xampp server once. Tadaaa!! You are done.
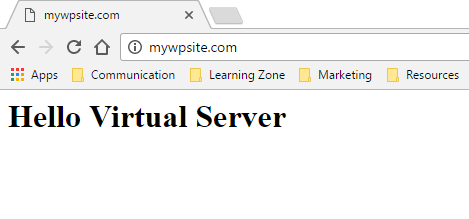
When you open a browser and enter the new URL instead of localhost/mywpsite, you should get a browser window like this image below. If so, your project is now running on a virtual web server, in case it fails, you should repeat this process carefully.
Creating more than one virtual localhost server:
If you’d like to add more than one virtual localhost server, you can do that too. In this case, you don’t have to include httpd-vhosts.conf file again. That means you surely can skip the step 02.
But there is a certain thing you should not forget. Remember in step one on the httpd-vhosts.conf file code, we replaced two virtual hosts. One is your default localhost server and another one is for the mywpsite’s virtual server, right?
For now, you don’t need to put the default server name again. You just have to add another virtual server name with its directory information just like you did for mywpsite’s server.
Lastly, you need to assign the default IP address of your localhost server to the newly added server name on Windows hosts file. In short, just repeat the step 03 with your new virtual server name.
Last Words:
You can add as many virtual servers as you want but it’s not a good idea. Too many of them can be the reason to slow down your server performance. My recommendation is to add one when you almost finished up the project in your localhost, to test that one before being hosted online.
If you face any problem in this regard, you can comment here. Just remember this technique only works in Windows operating system in which only the Xampp is installed as the development stack.
Thank you.
